Learn how to test the limit switch on garage door to ensure proper opening and closing. Step-by-step guide for safe, accurate adjustments and smooth operation.
The limit switch on garage door systems ensures your door opens and closes correctly. When properly set, it tells the opener when to stop, preventing the door from slamming shut or rising too far. Testing and adjusting the limit switch ensures safe and efficient function over time.
In this blog, we’ll explain how to safely and accurately test the limit switch on garage door openers, what symptoms indicate problems, and when professional help may be needed. The limit switch is often the issue if your door doesn’t fully open or close, or reverses at the wrong time.

Understanding the limit switch on garage door systems is essential for keeping the door working smoothly and avoiding preventable damage to the opener or the door itself.
What Is the Limit Switch on Garage Door Systems?
The limit switch is an important part of your garage door opener. It controls how far the door opens and closes, stopping at the right spots to avoid damage and keep you safe.
How the Limit Switch Works
Most modern garage door openers come equipped with two separate limit switches or adjustable dials:
- Up Limit Switch: Controls how far the door travels upward before stopping.
- Down Limit Switch: Determines how far the door travels downward before it stops.
These switches work by sending a signal to the garage door motor to stop running once the door reaches the designated point.
Why Proper Adjustment Is Important
If the limit switches are not set correctly, you may experience several operational issues with your garage door. Common problems include:
- The door does not close completely, leaving a gap at the bottom.
- The door slams shut, creating a safety hazard.
- The door reverses unexpectedly before fully closing.
- The door continues to run after fully opening or closing, straining the motor.
These issues can lead to unnecessary wear on the garage door system and pose safety risks to people and property.
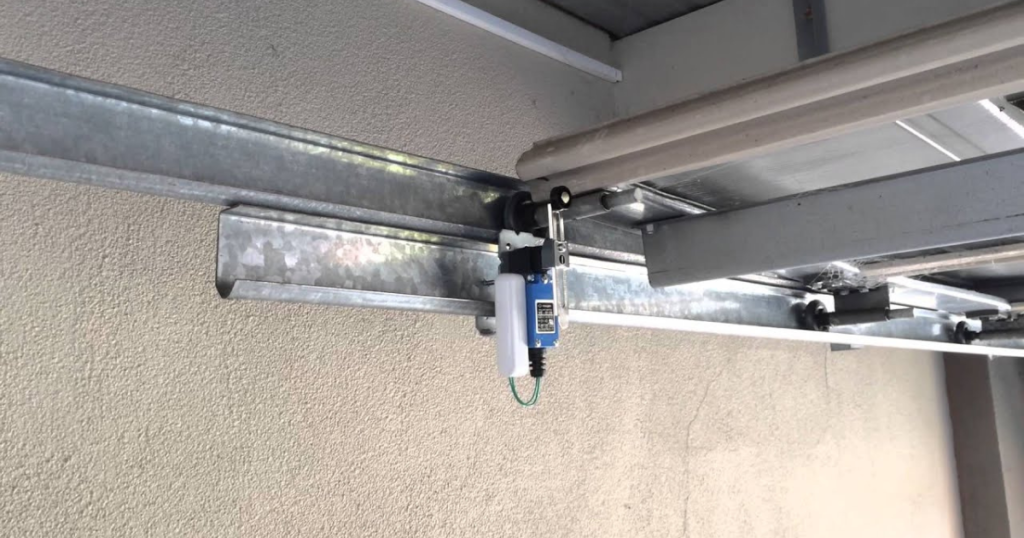
Where the Limit Switch Is Located
The location of the limit switch may vary depending on the garage door opener model, but it is generally found in one of the following places:
- On the motor housing (especially for screw-drive and chain-drive models)
- Along the rail system (standard in belt-drive openers)
- Near the terminal screw or dial control panel
Please refer to your garage door opener’s user manual to find your model’s exact location and adjustment method.
Maintenance and Adjustment Tips
Regular inspection and adjustment of your limit switches help ensure your garage door operates smoothly and safely. Here are a few maintenance tips:
- Test the door movement periodically to make sure it opens and closes fully without over-traveling.
- You can gradually adjust the limits using the control dials or screws, typically labeled “Up” and “Down.”
- Unplug the opener before making adjustments to avoid an electric shock.
- Consult a professional if the door continues to malfunction despite correct settings.
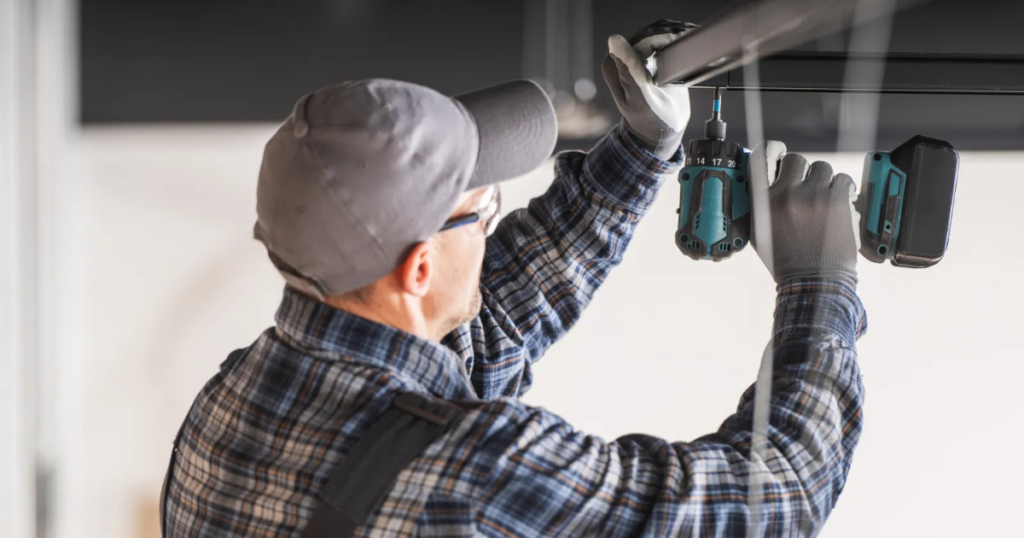
How to Safely Test the Limit Switch on Garage Door Openers
Step 1: Prepare Safely
- Unplug the opener or turn off the power at the breaker
- Use a stable ladder and keep tools nearby
- Ensure the garage is clear of people and objects
Step 2: Locate the Limit Adjustment Controls
- Check your opener model for the specific location
- Look for adjustment screws or dials labeled “up” and “down” or “open” and “close”
Step 3: Reconnect Power and Test
- Restore power to the opener
- Use the wall button or the remote to open and close the door
- Watch closely to see where the door stops during travel
Step 4: Adjust the Limits
- Use a flathead screwdriver to turn the limit screw or dial
- One full turn usually changes door travel by 2–3 inches
- Adjust in small increments, testing each time
If the door doesn’t stop at the correct height or touches the ground with too much force, keep adjusting until it stops at the right point.
When to Replace the Limit Switch
While regular adjustments and maintenance can keep your garage door working smoothly, there are times when the limit switch itself may need to be replaced. Over time, this small but vital component can wear out or become damaged, leading to problems that simple adjustments can’t fix.
Common Reasons for Limit Switch Failure
The limit switch may stop working correctly due to several reasons:
- General wear and tear from years of use
- Corrosion or rust, especially in humid or damp environments
- Internal electrical failure within the garage door opener unit
- Physical damage, such as cracks, broken mounts, or loose wiring
Signs You Might Need a New Limit Switch
If you notice any of the following issues, it could mean the limit switch has failed and needs to be replaced:
- Adjustments have no effect – turning the limit dials or screws does not change the door’s behavior.
- The switch appears broken or loose – visual signs of damage or parts out of place.
- The opener keeps running – the motor continues to run even after the door has fully opened or closed, which can cause wear or strain on the system.
- Inconsistent door movement – the door might stop too early or go too far, even after resetting the limits.
Replacing the Limit Switch
Replacing a faulty limit switch involves more than just unscrewing a part. It usually requires:
- Opening the garage door opener housing
- Identifying and removing the existing limit switch
- Disconnecting and reconnecting wires safely and correctly
- Possibly replacing or resetting other connected components
Since this process involves electrical work and internal motor components, it’s not recommended for someone without experience. Trying to fix it yourself could lead to further damage or pose a safety risk.
Call a Professional for Help
Unless you’re experienced with how garage door openers work and have the right tools, it’s best to hire a professional technician. A trained expert can quickly diagnose the issue, replace the limit switch if needed, and ensure your garage door is working safely and correctly.
Why Limit Switch Testing Is Critical
The limit switch on garage door systems isn’t just for convenience—it directly impacts safety. A door that doesn’t stop at the correct place can:
- Damage the flooring, vehicles, or the door itself
- Cause the opener to overheat
- Create a hazard for people or pets
Your garage door maintenance plan should include routine limit switch testing, lubrication, and hardware inspection.
Frequently Asked Questions
How do I reset my garage door limit switch?
To reset your garage door limit switch, locate the limit adjustment screws on the opener—typically labeled “up” and “down.” Turn the appropriate screw slightly with a screwdriver to adjust how far the door opens or closes. Test the door after each adjustment until it stops at the correct position.
Where is the garage door limit switch located?
The limit switch is typically located on the garage door opener motor unit, near the track or rail where the opener arm moves. On most openers, the limit switches are small plastic knobs or screws that can be turned to adjust the open and close positions. Refer to your opener’s manual for the exact location.
What triggers a limit switch?
A limit switch is triggered by the door’s movement as it reaches its fully open or closed position. Once the door hits the pre-set point, the switch signals the opener to stop moving. This prevents the door from overtraveling and causing damage.
What is the purpose of a limit switch?
The limit switch ensures the garage door stops at the correct points when opening or closing. It protects the motor and the door system from strain or overextension. Properly set limit switches help maintain safety and efficient operation.
What are the symptoms of a limit switch?
Symptoms of a faulty or misadjusted limit switch include the door not closing or opening all the way, reversing suddenly, or the motor running too long. You might also hear unusual noises or see the door stop in the wrong position. These signs indicate the need to check and reset or replace the limit switch.
Conclusion
The limit switch on garage door openers is vital to ensure correct and safe operation. A misadjusted or faulty switch can cause performance issues or even damage your door system.
Testing and adjusting the switch is manageable for many homeowners, as long as they follow safety procedures and use the correct tools. However, if basic adjustments don’t work or leave you unsure, it’s best to bring in a professional.
Trust the team at Rowlett Garage Door for expert diagnosis and repair of your garage door system, including limit switch issues.
End Note
Rowlett Garage Door and Gate is your trusted source for garage door services in Rowlett, TX. We deliver top-quality craftsmanship and unmatched value to every customer. Whether you’re looking for a complete new garage door installation or urgent garage door repairs, our expert team handles each project with precision, care, and attention to detail.
We specialize in a full spectrum of garage door services, including modern garage remote control solutions. Proudly serving Rowlett, Anna, and surrounding North Texas communities, we are known for our reliability, affordability, and honest service. Visit our About Us page to learn more about our team and commitment to excellence. Our Q&A section answers common concerns. Please Contact Us for fast, friendly, personalized support if you need assistance.
Rowlett Garage Door and Gates
5813 Cypress Dr, Rowlett, TX 75089, United States
+14699208704